Install Google Service Framework on Windows 11 WSA

Windows Subsystem for AndroidTM (WSA) is one of the new features of Windows 11. It enables Windows 11 devices to run Android application in a virtual way. Microsoft only allows you to install apps from Amazon App Store which means your choices are very limited. In Addition, the WSA doesn't enquipped with Google Services Framework (GSF) so Google Apps such as YouTube cannot run properly on WSA even if installed with sideload.
Thanks for WSA-Community, there is a repository on Github that can do modifications on the WSA install package to add GSF support. This tutorial helps you install Google Service Framework as well as Google Play Store to the WSA on Windows 11.
Prerequisites
- Windows 11 (version higher than 22000.xxx series)
- Windows Subsystem for Linux (Version 2)
- 7-Zip or any other extraction software
- OpenGApps
- WSAGAScript
- Android Debugging Bridge (ADB)
Installing Windows Subsystem for Linux 2
Install steps:
- Open Windows PowerShell as an Administrator
- Run
wsl --install: this will install Ubuntu 20.04 LTS in WSL (Version 2) and all necessary components required to run as it is default (this is recommended) - Check with
wsl --list --verboseto be sure that you have a Linux Distro installed with WSL2 version. If for some reason you have receieved WSL1 kernel (or you have trouble running this command in general) - follow instructions in the section below to perform conversion.
Microsoft Docs: Installing WSL
What if I already installed WSL (version 1)
Microsoft Docs: Manual installation steps for older versions of WSL
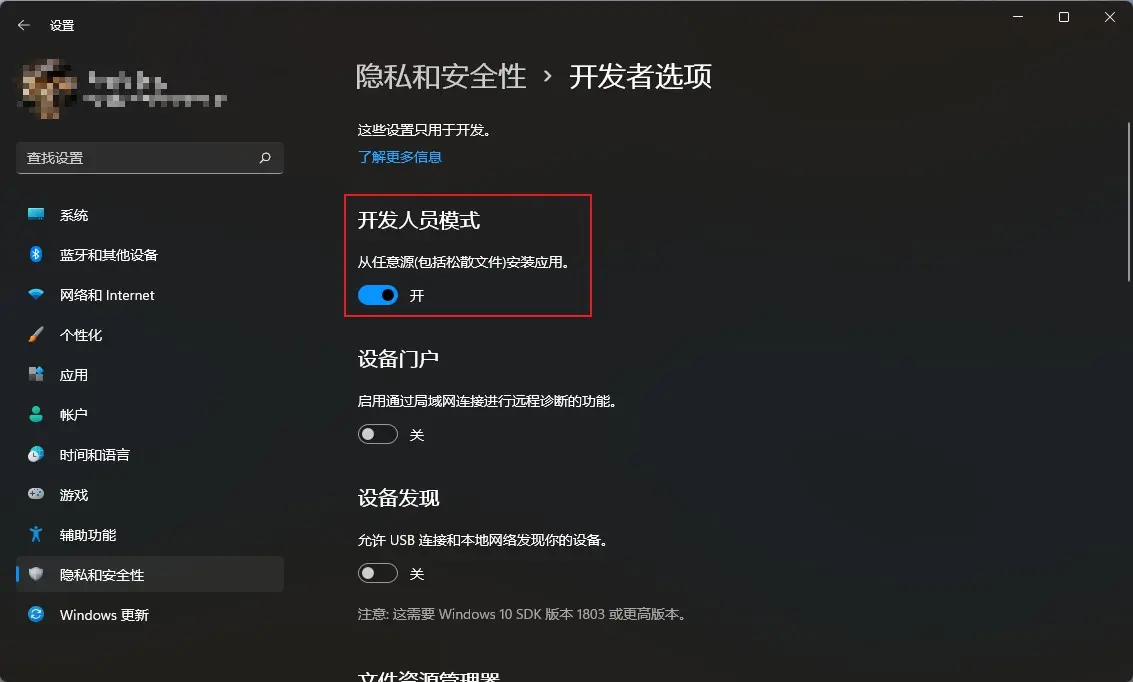
Enable Developer Mode on Windows 11
Developer Mode allows you to install applications on your computer from any source. Follow the instructions to enable it:
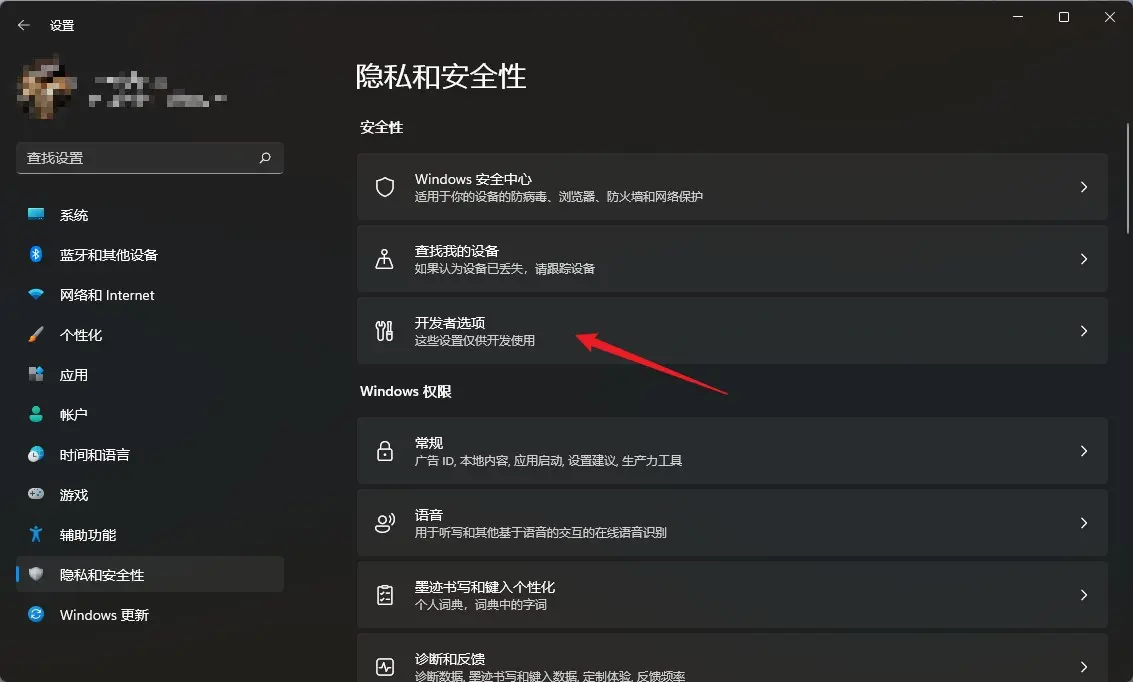
- Open the Windows Settings app.
- Navigate to Privacy and Security on the left side panel.
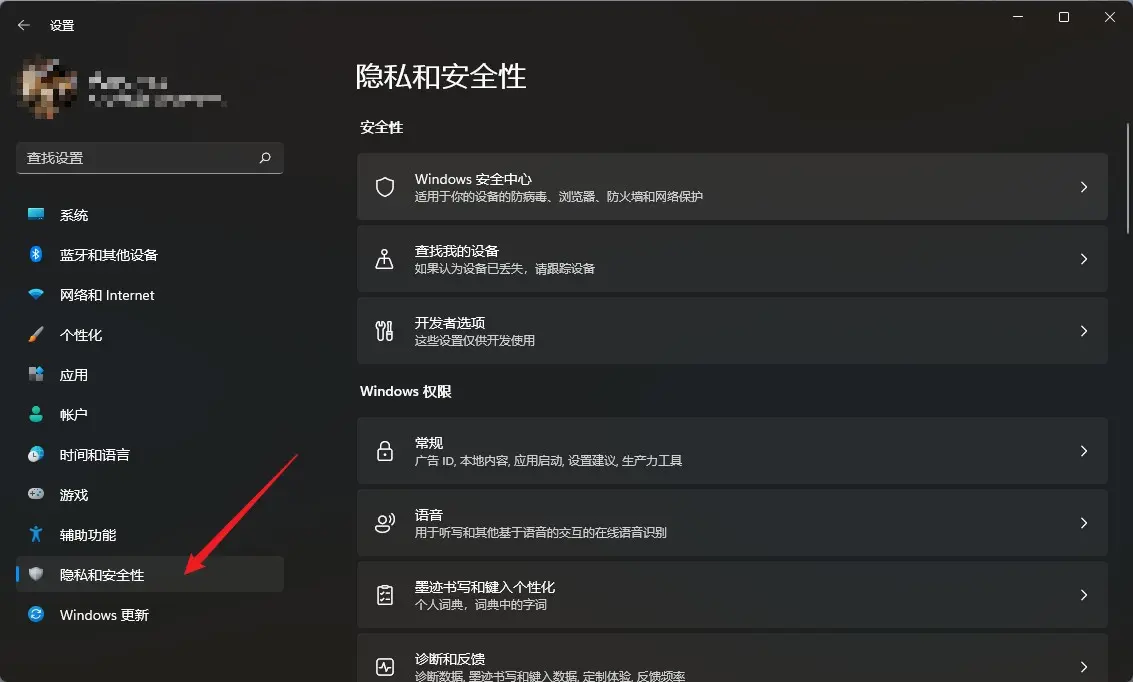
- Click on the For developers option on the right.
- Enable the Developer Mode by click on the toggle.
Downloading Windows Subsystem for Android
As mentioned before, we have to do modifications on the Windows Subsystem for Android. To do this, you have to first download the WSA package.
- Head to rg.adguard by click this link
If you have any problem when download any source in this tutorial, I created a google drive share link which contains all the download files required.
- Choose ProductId from the drop-down menu on the left.
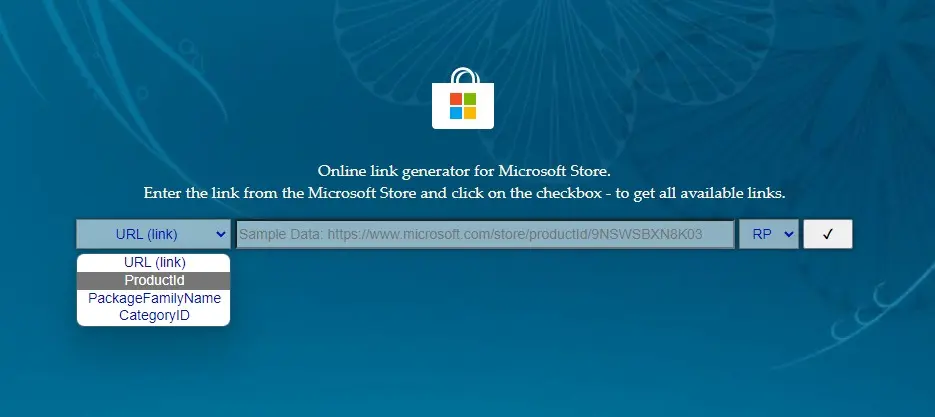
- Copy and paste
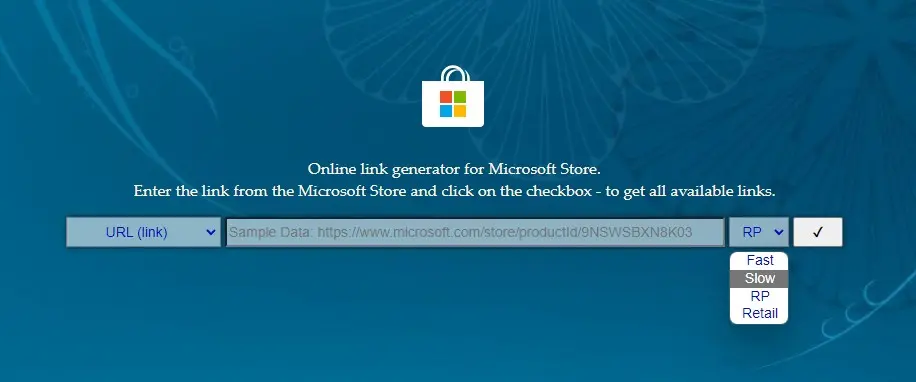
9P3395VX91NRin the search box. - Choose Slow from the drop-down menu on the right and click the tick button.
- Scroll down and look for the
MicrosoftCorporationII.WindowsSubsystemForAndroid_x.x.xxxxx.0_neutral_~_8wekyb3d8bbwe.msixbundle. The file size is about 1.2G. Click on the filename to download the WSA package.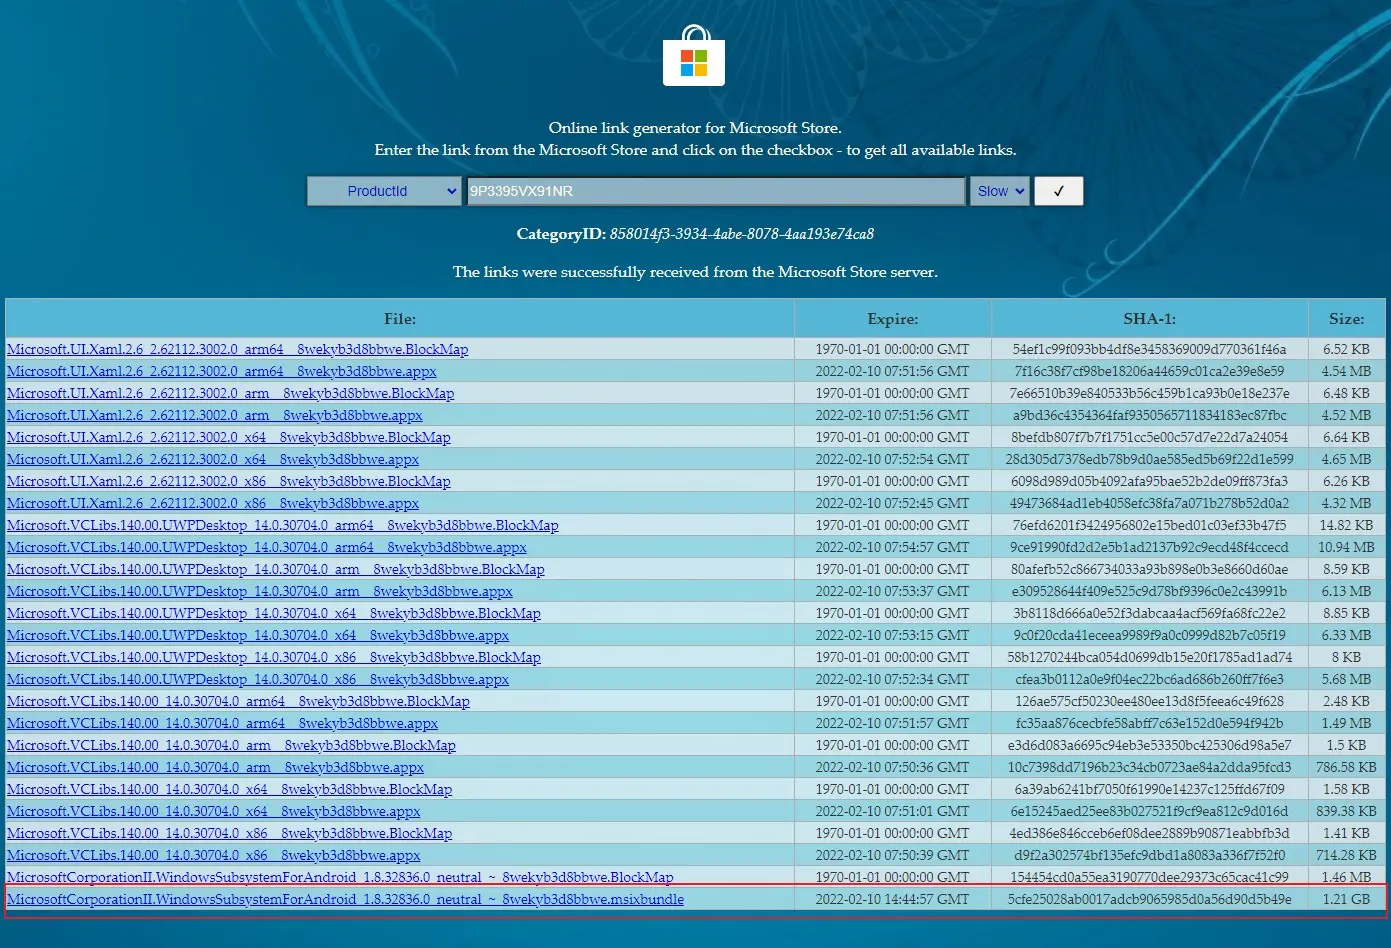
Download Open GApps
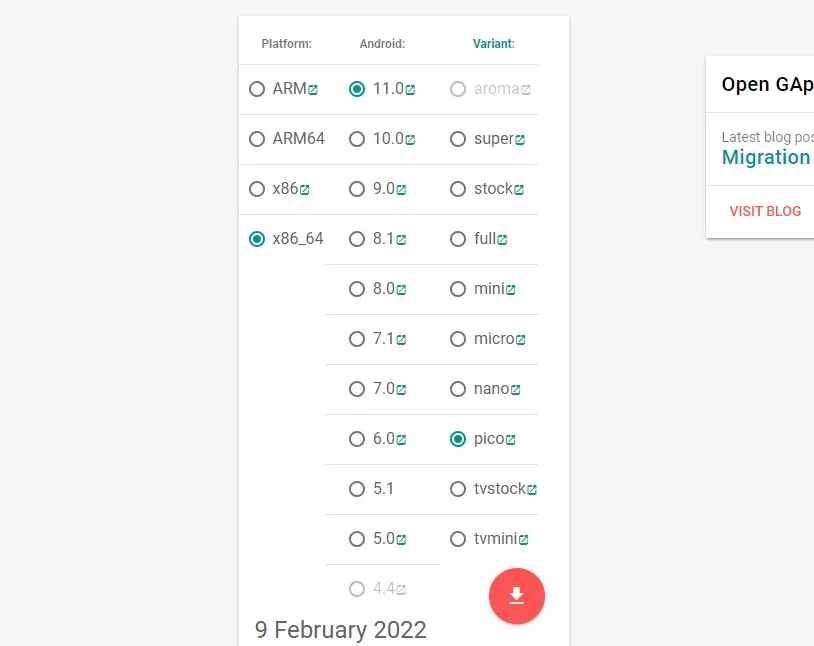
Head to the Open GAPPS website to download the Open Gapps tool.
- Platform: x86_64
- Android: 11.0
- Variant: pico
Then click on the red button to download.
Download WSAGAScript
Download the WSAGAScript from the github page repository.

Click on the green button Code and select Download ZIP in the drop-down menu.
Download Android Debugging Bridge Toolkit
The last thing you have to download is the Android Debugging Bridge Toolkit (ADB). Simply click this link and download the .zip file.
Modification & Installation Procedure
Create Required Folders
Create 3 folders under the root path of your system partition which is usually the C:\ drive. Then, rename them as WindowsSubsystemAndroid, GAppsWSA and ADBKit.
Prepare Required Files
- Open the Windows Subsystem for Android package (.Msixbundle file) with a file archiver (Recommend: 7-Zip). Find the Wsa-Package-[version]-Release-Nightly.msix package and extract all the files in it to
C:\WindowsSubsystemAndroid\. Then, delete theAppxMetadata,AppxBlockMap.xml,AppxSignature.p7x, and[Content_Type].xml. - Extract files under
WSAGAScript-main.zip\WSAGAScript-main\toC:\GAppsWSA\. - Move the open_gapps-x86_64-11.0-pico-xxxxxxxx.zip file to
C:\GAppsWSA\#GAPPS\ - Copy the product.img, vendor.img, system_ext.img and system.img under
C:\WindowsSubsystemAndroid\toC:\GAppsWSA\#IMAGES\folder. - Extract files in ADBKit.zip to
C:\ADBKit\
Modify Windows Subsystem for Android
Now we are ready to modify the original Windows Subsystem for Android to equipped with Google Service Framework and Google Apps. In this step, we need to use the WSL to do the modification.
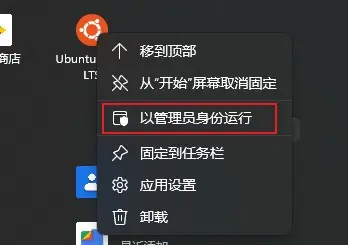
- Run the WSL as administrator. (Right click on the icon and choose Run as administrator. The tutorial will use Ubuntu 20.04 LTS as example)
- Execute
sudo suin the WSL terminal and provide the root password to obtain root privilege. The $ in the prompt should turn into #. - Change the current path to GAppsWSA.
cd /mnt/c/GAppsWSA - Update the package lists.
apt update - Install unzip and lzip tools.
apt install unzip lzip - Install dos2unix tool.
apt install dos2unix - Execute the following commands line by line to convert the respective scripts to UNIX format.
dos2unix ./apply.sh dos2unix ./extend_and_mount_images.sh dos2unix ./extract_gapps_pico.sh dos2unix ./unmount_images.sh dos2unix ./VARIABLES.sh - Execute the converted scripts one by one.
./extract_gapps_pico.sh
./extend_and_mount_images.sh
./apply.sh
./unmount_images.sh
Now you have modified the .img files. Do the following steps to complete the modification on the WSA:
- Copy the 4 .img files under the
C:\GAppsWSA\#IMAGES\toC:\WindowsSubsystemAndroid\and replace the origianl .img files. - Copy the kernel file kernel-x86_64 under
C:\GAppsWSA\misc\toC:\WindowsSubsystemAndroid\Tools. - Rename the kernel file under
C:\WindowsSubsystemAndroid\Toolsto kernel_bak. - Rename the kernel-x86_64 file under
C:\WindowsSubsystemAndroid\Toolsto kernel.
Install Modified Version of Windows Subsystem for Android
Now we have finished the modification on the Windows Subsystem for Android. Then comes to install the WSA with terminal command:
- Open the Powershell / Windows Terminal as Administrator.
- Execute the following command to install the modified Windows Subsystem for Android:
Add-AppxPackage -Register C:\WindowsSubsystemAndroid\AppxManifest.xml - Once the progress bar finished, Windows Subsystem for Android with Google Service Framework should be successfully installed on your computer.
Set up Google Play Store on Windows Subsystem for Android
- Open up the Start Menu and search for Windows Subsystem for Android and open it up.
- In the popped up window, turn on the Developer mode by click on the toggle switch.
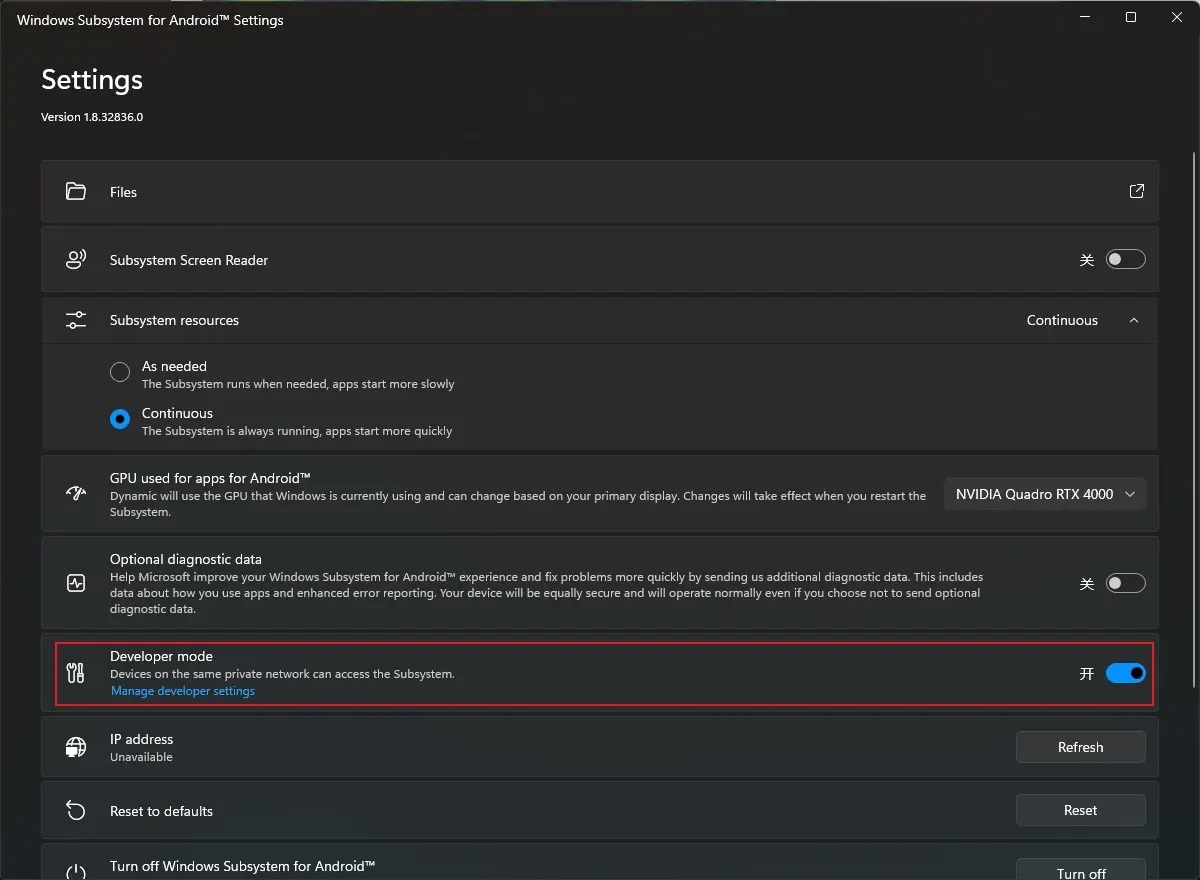
- After that, click on the Manage developer settings and make sure uncheck the Share my diagnostic data check box. Then, click the Continue button.
- In the Powershell / Windows Terminal (Administrator), type the following command to navigate to the ADBKit directory:
cd C:\ADBKit - Connect to the Windows Subsystem for Android with ADB:
.\adb.exe connect 127.0.0.1:58526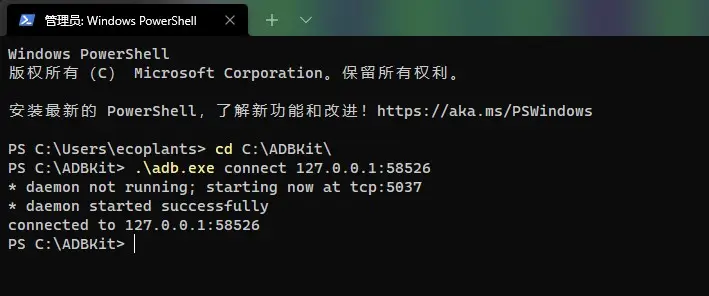
- Once have connected, type the follow commands to make the Google Play Store work:
.\adb.exe shell
su
setenforce 0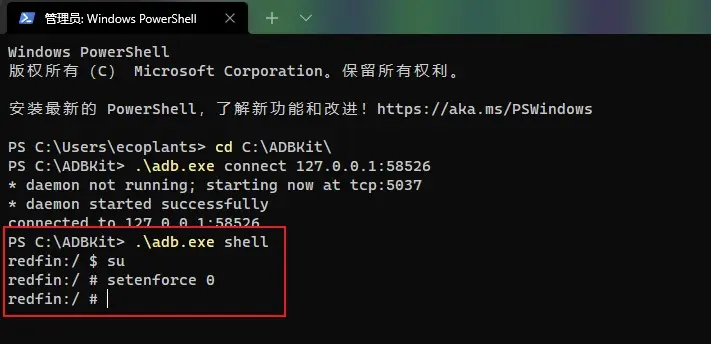
- Now you should be able to find Play Store in the start menu. Sign in your google account and enjoy yourself : )